
We will explore the different ways to protect an Ubuntu Server.
Disabling Root Access
You can do this through several methods:
- Disabling the root login shell
- Disabling root SSH login
- Disabling root using PAM (Password Authentication Module)
Before you continue with
/etc/passwdi would recommmend to set a password for the root user.
You need to edit the /etc/passwd file to be the following:
root:x:0:0:root:/root:/usr/sbin/nologin

setting it to /usr/sbin/nologin will reject the root login.
If you try to log in as root, it would immediately kick you out.
If you don’t want any user even users in the sudo group to be able to execute
sudo -s, before doing this make sure you have another user that can log in as root.
sudo visudo -f /etc/sudoers.d/99-block-root-shells
Put only this in the file:
Cmnd_Alias ROOT_SHELLS = /bin/sh, /bin/bash, /usr/bin/bash, /usr/bin/dash, /usr/bin/zsh, /usr/bin/sh, /bin/su, /usr/bin/su
%sudo ALL=(ALL:ALL) ALL, !ROOT_SHELLS

This file is read after /etc/sudoers, so your deny wins.
Locking a User’s Home Directory
default configuration prioritizes collaboration and ease of access over strict privacy
1) Viewing the Current Configuration
You can verify the current setting without opening the full file by using grep:
grep -i "^UMASK" /etc/login.defs

UMASK           022
2) Securing New Users
To ensure that future users are created with restricted home directories (readable only by themselves), you would edit /etc/login.defs and change the UMASK value.
Current: 022 (Results in 755 permissions: rwxr-xr-x)

Secure: 077 (Results in 700 permissions: rwx------)
Note: This change only applies to users created after the edit.
3) Securing Existing Users
Changing the configuration file won’t retroactively fix users that already exist on the system. You must manually lock those down:
chmod 700 /home/username
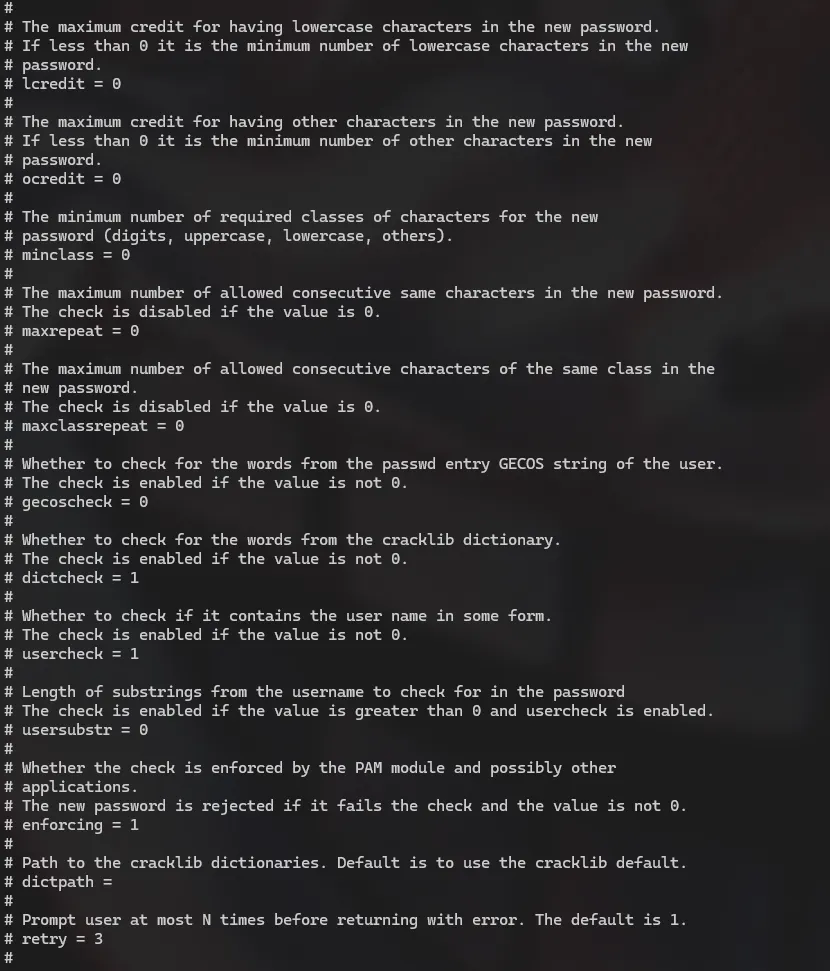
Meet pwquality,
Technically, it’s a PAM (Pluggable Authentication Module) plugin. Humanly, it’s a quality control inspector.
In the old days, systems just checked simple boxes, Is it 8 characters? Yes/No. pwquality is smarter. It assigns every proposed password a score based on complexity, dictionary words, and patterns. If the score isn’t high enough, the password gets rejected.
Credits
The configuration file is located at /etc/security/pwquality.conf.
When you open it, you will see settings like dcredit, ucredit, lcredit, and ocredit. These control requirements for Digits, Uppercase, Lowercase, and Other symbols.
The math here is weird, so let’s simplify it. The values can be positive or negative, and they mean totally different things
-
Negative Numbers = Mandatory Rules. If you set
dcredit = -1, it means: “You owe me at least 1 digit.” If the user doesn’t type a number, they can’t save the password. This is what most admins want.- Positive Numbers = Bonus Points. If you set
dcredit = 1, it means: “If you use a digit, I will give you +1 credit toward your total score, potentially letting you use a shorter password.”
- Positive Numbers = Bonus Points. If you set
My advice? Stick to negative numbers. It’s easier to explain to your users: “You must have a number” is a clear rule.
You want a setup that stops “password123” but allows “Correct-Horse-Battery-Staple”.
Here is a balanced configuration block you can paste into /etc/security/pwquality.conf that is secure but fair:
# Length is the single most important factor in security.
minlen = 12

# The user MUST use at least one digit.
dcredit = -1

# The user MUST use at least one uppercase letter.
ucredit = -1

# The user MUST use at least one special character (!@#$).
ocredit = -1

# Check the user's input against a dictionary of common words, If they use "password" or "admin", it fails.
dictcheck = 1

# Don't allow the username inside the password.
usercheck = 1
The Lifecycle of a Password
If a password stays valid forever, the chance of it being compromised increases every single day. But if you force users to change them too often, they’ll hate you. :)
1) Password Expiration
By default, Ubuntu sets passwords to last for 99,999 days. That is roughly 273 years, that’s not great for security.
We control this in /etc/login.defs.
Open that file and scroll down to the Password aging controls section. Here are the three settings that matter:
-
PASS_MAX_DAYS (The Limit): How long the password lives.
-
Recommendation: 90 to 180 days.
-
Why: It limits the damage if a password is stolen. If an attacker gets a password on day 89, they only have access for 24 hours.
-
-
PASS_MIN_DAYS (The “Cool Down”): How long a user must keep a password before changing it again.
-
Recommendation: 1.
-
Why: This prevents “rapid cycling” (we will explain this in the History section below).
-
-
PASS_WARN_AGE (The Courtesy): How many days before expiration the user gets a warning.
-
Recommendation: 7 or 14.
-
Why: Don’t surprise your users. Give them a week to think of a new phrase.
-
Pro Tip: Just like with the UMASK, changing
/etc/login.defsonly affects new users. To change expiration for an existing user (like yourself), use thechagecommand:
sudo chage -M 90 -m 1 -W 7 username
2) Password History
let’s be honest Users are creatures of habit. If you force them to change their password from Summer2023, their immediate instinct is to change it to Summer2023! and then change it right back to Summer2023 as soon as possible.
Password History remembers previous passwords and blocks them.
To configure this, we leave /etc/login.defs and head over to PAM: /etc/pam.d/common-password
Look for the line containing pam_unix.so. You simply add remember=10 to the end of that line.
It looks something like this:
password [success=1 default=ignore] pam_unix.so obscure use_authtok try_first_pass sha512 remember=10
You might be wondering: Why did we set PASS_MIN_DAYS to 1 earlier?
If you set History to 10, but Min Days is 0, a frustrated user can run a script to change their password 10 times in 5 seconds just to flush out the history buffer and get back to their original password.
By setting Min Days to 1:
-
They change their password today.
-
They try to change it again immediately? Denied. “You must wait 1 day.”
-
To cycle through a history of 10 passwords, they would have to log in every day for 11 days straight just to change it.
They will eventually just pick a new password, which is exactly what we want.
lxd Group
Ubuntu places users (unless otherwise specified) into the lxd group. This group is known to be a point of privilege escalation and should be removed from any user that is a part of it.
groups

ubuntuserver adm cdrom sudo dip plugdev lxd